Wednesday, November 14, 2012

Christmas Tags

For scrapbook club this month we were to make Christmas tags for each of person in our group.  I couldn't wait to use my new Saturated Canary stamp called Candy Canes.


First, I colored my image with Copic markers and then I added Burgundy Stickles to her dress and then Star Dust Stickles to her wings and bag.  I also added some sparkle to her eyes and bows using my Atyou Spice glitter pens.

I then scanned my colored image and imported it in to Silhouette Studio, traced the image, and then cut out 11 of them on my Silhouette Cameo.  I also cut out 11 tags (the main base of the tag on Kraft cardstock, the front on patterned paper from the  "Old World Winter" stack by The Paper Studio, and the back of the tag which is embossed with snowflakes from a Cuttlebug folder.)

Next, I combined two different Silhouette images (the swirly image and the holly leaf) and offset it...then cut 11 of them out.  I added some irocks to the ends of the swirls.

I then added some twine borders, a velvet snowflake (from a Martha Stewart punch), a holly border at the bottom from K & Company, and then strung three bells.  I had a hard time finding the right sentiment for it...but then I found the "Believe" image in my chipboard stash.  So, I scanned the chipboard, traced it in Silhouette Studio and cut 11 of them.  Lastly, I added the green ribbon at the top and some small white flowers by Recollections.

It was a long process making 11 of them but I am very proud of them!  =D  I can't wait to give them out on Saturday at the all day crop our club is attending at our local scrapbook store.

I am also entering this in to the Saturated Canary Tag Contest on the Little Darlings Design Team Inspirations blog found Here.

Sunday, November 4, 2012

Paper Christmas Ornaments

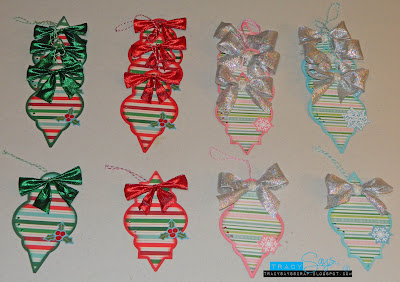
Here are some paper Christmas ornaments that I made to exchange at my scrapbook club for October's meet up.  I designed the ornament in Silhouette Studio's Designer Edition.  The holly  leaves are from the Silhouette store and the snowflake is from a Martha Stewart punch (but the shadow of the snowflake and the one snowflake in the first photo are from a file in the Silhouette Store.)  For some reason the white paper for the snowflakes did not cut very well on my Cameo.


Also, I have always struggled with making bows out of ribbon, but I found a way to make them using the wider/wired type of ribbon.  Here are some step by step photo directions on how I did it.


Gears...Male Birthday Card

A male birthday card made a while ago using DCWV's Tattered Time stack and gears from the Silhouette store.


How to make this card:


Baby Book

This is a baby book that I finished up in March.  I pretty much made it with thin chipboard, my Bind It All (by Zutter), K & Company cardstock, and mostly stickers.  The name on the front and the white edging was cut with my Silhouette Cameo.  We gave this to hubby's friend/co-worker.


Slacker...

I have been being a total slacker on keeping up with my blog so I am going through my projects from this year and will just put them in one big blog post.  lol  I think this will catch me up!  =D

This is a birthday card that I made for my mom.  I was super busy during this time period...so I put this together very quickly.


This is a Christmas cookie recipe card that I made for the scrapbook club I joined in August.  I made this digitally in Photoshop Elements and then laminated it and added eyelets, twine, and a button so that it could be hung from a kitchen cabinet or refrigerator magnet


This is a card that I made for my parent's former neighbor who lives in Florida (who happens to share the same birthday as Korbin.)  Jennie turned 99 this year and she is quite an amazing lady.  The image is from Mo Manning.
This is a card that I made for my first project with my scrapbook club.  All of the cuts are from the Silhouette store.
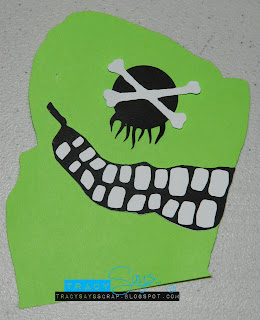
This is a layout I made with photos from my son's anime conventions (Anime Central.)  Korbin designed and painted the hoodie in the photo and I traced and recreated the face in Photoshop Elements and then traced it in Silhouette Studio and cut it on my Cameo.

I was inspired by a similar card (will have to find the blog of the original and post it later) and made this for my scrapbook club too.  The flower and leaves are all files from Silhouette Studio.
I bought my first Magnolia stamp (finally) and this is what I made with her.
I designed this owl from scratch using Designer Edition of Silhouette Studio.  This is a card I made for my nephews birthday.


This is an image that Korbin drew and I colored.  I then scanned her in and made the background digitally (just playing around.)
All of the cuts on this layout are from the Silhouette store (they monkey, title, and bamboo.)
This is a birthday card that I made for my hubby's birthday.  The plane is from the Silhouette store and I made the sentiment with a regular font and cut them on my Cameo.


This is a card I donated to a little girl with cancer.  The image is from the Greeting Farm and I actually colored it when I first started coloring back in 2010.  I thought it was bright and cheery and would be fun.  I have a lot of already colored images...just waiting to be used.

This is a card that I made for my hubby for Fathers Day.  All cuts were done on my Cameo and the tv image is from the Silhouette store.


Just a cute card with a Tiddly Inks image.


This is the first real card I made using my Silhouette Cameo.  I love how intricate this machine can cut.  It is far superior than my Cricut machine was.  All cut images are from the Silhouette store.

The controller image is from the Silhouette store. 

My favorite group (RIP MCA)...I made this in Photoshop Elements 10.
A cute card I made using a Spesch Designer Stamps image.

A cute Saturated Canary card I made early in the year.